TWIXTOR EDIT TUTORIAL
TUTORIAL ON HOW I EDITED
A LONSOO.AVI STYLE VIDEO
TBH it isn't fair to
call it a lonsoo.avi style edit since this kind of edit has been there before
but his one got popular recently and people started quoting it as his edit, and
some of them even tried to copy this style of editing and failed so i decided
to make a tutorial on how to do it, but I haven't been into editing much theses
days so my edit wasn't that good but i am sure if you are into it and you
follow my steps you pull off a very good twixtor time remap effect ;)
Software used: Adobe After effects cc 2019 [ to
add various effects and stuff ]
Adobe Premiere pro cc 2019 [to
arrange the clips initially
Plugins used:
*Twixtor
*Motion Bro [https://motionbro.net/videolancer/free-presets/] recommended if you wanna save time
while doing those slide transitions it's free as well just type the price as 0,
you gareeb cunt. Also you dont need HST the free preset pack of motion bro will do the work
PS: It's not recommended
if you want to improve your editing since its a shortcut tool !
Some other PLUGINS recommendation:
*Red giant universe [it's not free and you are indian enough to
react awkwardly to the price so i am not even going to leave the link but if
can get it from somewhere it would be nice]
Recommended SCRIPTS for
the edit:
*Motion Tools from motion design school
*Beatnik or Beat Assistant [not free/not necessary] [anyone of them
will do even though this isn't important but might help to speed up workflow
]
The original post got
deleted idk why copyright issue maybe but here’s a popular reupload of that:
https://www.instagram.com/p/B2kIwgdgm_w/
First the Name of the Song since i saw most of you asking it in my post :
It's a mashup of two songs The Less I Know The Better & Sexy Back
[ https://youtu.be/3oZkf9dai9I ]
Once you are done
selecting your song it would be nice if you knew the bpm might end up saving
sometime if you want to get it done as quick as possible for this song though
the bpm is 116 https://songbpm.com/searches/the-less-i-know-the-better , a simple google search usually reveals it
incase of a mashup just google any one of the songs used in mashup and usually
they are the same. There's an after effects plugin to know the bpm of a song
more on that later
Difficulty level: intermediate
If you have never used
after effects before then I don't think you will understand anything XD i
recommend you to watch other tutorial preferably video and try using twixtor
for yourself once or twice before referring to this tutorial.
Here’s a tutorial by camera
boyz in hindi https://youtu.be/9CXJtv904mg
Its good but his method
is the most common one i will show you guys a different and faster
approach but to know this faster approach you should be familiar with the
general way first and that is why left a link to that tutorial above. If you
don't find the tutorial good enough then there's another tutorial but it's in portoguese
i guess here's the link : https://youtu.be/gFGNd3fwqtM
One common trend in
these edits are that they tend to use a lot of keyframes which definitely makes
it more customizable but makes the editing process more tedious
So here’s my workflow
less tedious but also less customizable but i will tell you along the way how
to make it more customizable
Step 1: sync and arrange
the clips in premiere pro
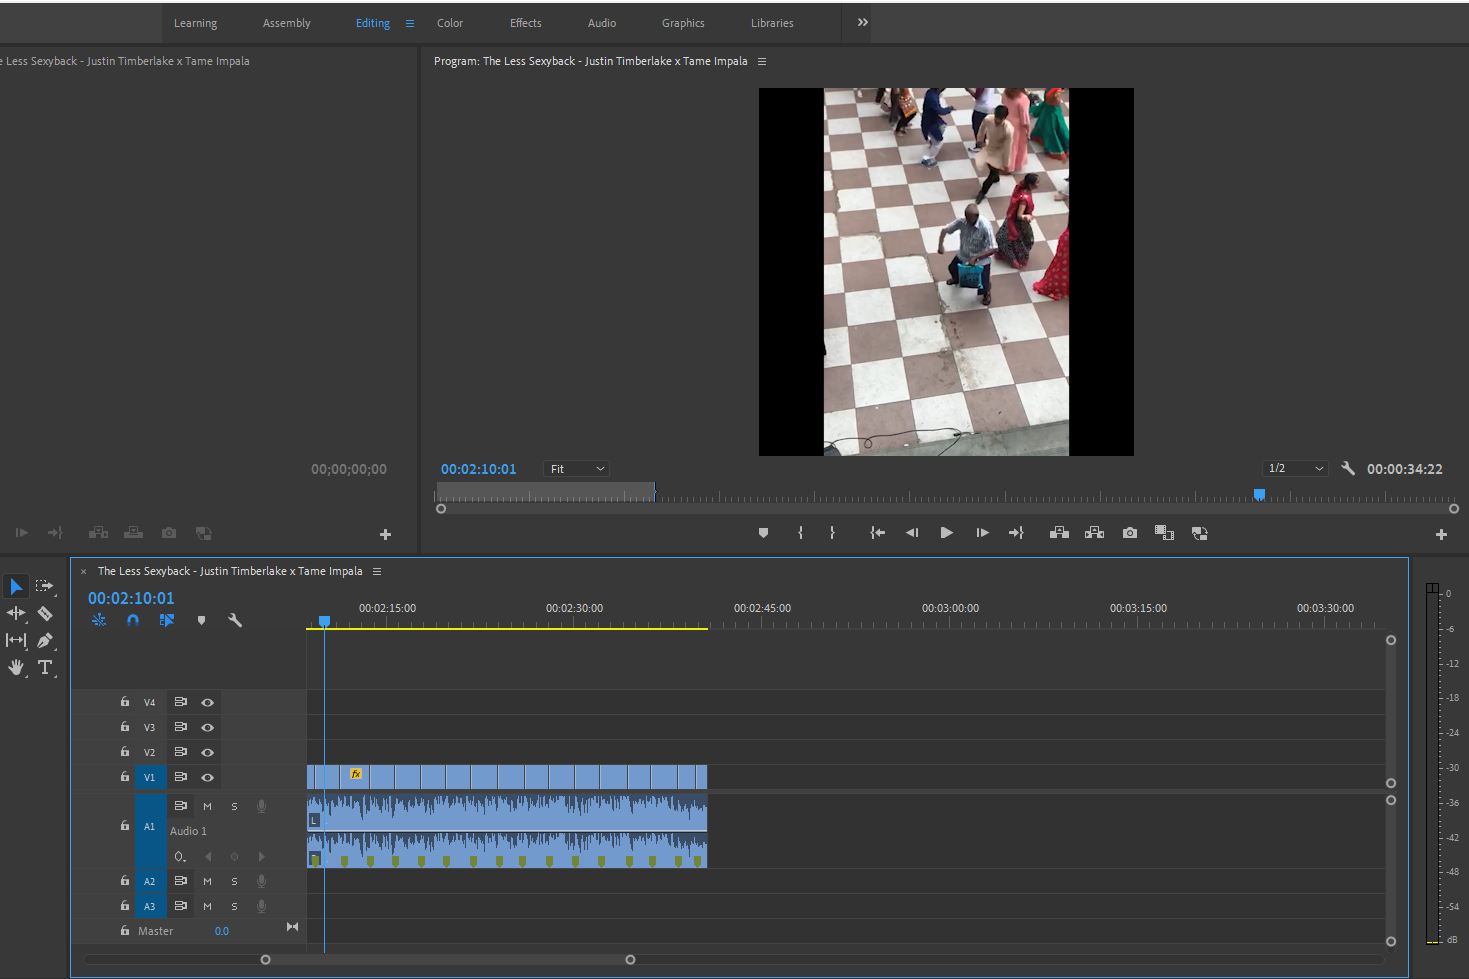
2. Once you are done
select them all and nest

3.right click on the
nested sequence and click on replace with after effects
This is where the magic happens
4.Now open the comp by
double clicking on it and add the twixtor effect to the first clip inside the
after effects composition
I used these settings
[notice: even though i am using twixtor pro but the same will apply for the
normal version of twixtor as well just the speed is what’s gonna matter ]

5.Now once you are done
with this got to the very first frame and set a speed keyframe of 25% then go
to the 7th frame and make it 300% and then go to the 14th frame and make it 25%
[This values are not
restricted, I request you all to experiment with this and make a better version
/ the values that i wrote worked for me and I discovered them experimentally]
Once you are done with
that select all the vales and alt click on the keyframe timer
Paste this value in the
expression window :’)
n =
marker.nearestKey(time).index;
if(time <
marker.key(n).time){ n=n-1;
}
if(n==0){ n=1
}
t=time-marker.key(n).time;
thisProperty.valueAtTime(t)
What this expression
does is it activates the keyframes only when there are markers in the layer
hence saving you a lot of time that you would otherwise spend keyframing
it
to place a marker simple press the * key on you keyboard (laptop user who don't have the numpad can change and assign it to some other key)
Now copy the keyframes
and paste it in the beginning of all the layers, after effects magically copies
the effect and expression along with the keyframe values
Make sure to paste it at
the very beginning of each layer and not from where the video is starting, once
you are done select all the layers [ctrl+a] and press u
And it should look
something like this [notice how the keyframes are at the beginning of each
clip]

Now all you have to do
is just add markers to the clip wherever there is a beat or you want the clip
to speed up
Well that was small
secret and I guess once you understand that you can do the rest yourself just
add markers and one more thing you will notice is that the scenes that you
chose in premiere pro got misplaced after adding twixtor, that happened coz
twixtor made the whole video slow [25%] till you placed your first marker so
the solution to that is adding lots of markers from the point where the clip
starts I will show it to you in the image below
Here you can see how
adding lot of markers in the beginning of the clips helps solve the problem
6. Now add the
transitions i used motion bro to save time but i recommend you do it manually
unless of course if you don't have time.
To do it manually,
search : Whip Pan Transition tutorial
To do it automatically :
motion Bro transition tutorial
7.Once done with the
transitions select all the layers and pre compose them
Now its time to add the
zoom in + shake effects if you want
Now for this i plan to
make a different well explained tutorial
But since you all are
very nice and I don't trust my dedication with tutorials so imma share it
here
8. Make a null layer
mark the first keyframe at 100 then after 3 frames 125 then after 3 more frames
make it back to 100
Now select those 3
keyframes easy ease them and alt click on timer and add The same expression as
before
n =
marker.nearestKey(time).index;
if(time <
marker.key(n).time){ n=n-1;
}
if(n==0){ n=1
}
t=time-marker.key(n).time;
thisProperty.valueAtTime(t)
Now add markers where
there are beats, you can do this manually or add a script like beatnik or beat
assistant where you to write the bpm of the song and the script adds the
markers automatically [for this edit i used this shortcut]
Previously i used to use
a different technique where i used keyframes from the audio and made connected
the scale value to it and customized it with an expression
linear(value,40,80,100,125)
Which i learned from
this tutorial: https://youtu.be/FC1B4Y328Rk
9. Similarly you can add
flashes by adding a adjustment layer and adding a glow effect on it and then
making its opacity 100-0-00 in about 6 keyframes and use the above marker’s
expression to link it to markers and done

10. You can even add
shakes if you want using the above trick / add shake in the entire video select
all the layers and pre compose it and then add a wiggle expression on top or
use uni.camera.shake given you have red giant universe installed
11. Apply color
correction or some other shit like that if you want and you are done
BEST OF LUCK making your own shitty twixtor edit k bye
UPDATE(12th
october): Aight so i made a couple of mistakes in my last tutorial which
resulted in wacky output result, first big mistake was when syncing zoom-in to
markers i should have moved the markers few frames ahead as the point of impact
of those edits where supposed to happen right with the beats and not after the
beat, even though it wasn't quite noticeable but the off-sync kinda killed the
vibe of the edit so to improve the timing of scale and shakes all you gotta do
it move all the markers a few frames forward, of if you were like using a diff
layer like me you can just move the layers and if you were doing everything
within the same layer then i recommend you use a script called marker conductor
it will help you move all the keyframes at once.
Since my edit was
heavily relied on automation i thought why not remove the use of manual
keyframes totally and i tried to do that yesterday and succeeded
Here’s the edit if you
haven't seen it already
You can notice how well
this is compared to the last video, and the reason being I automated
everything
[notice: I did not add
any shakes or glow as it would have killed the vibe of the video]
I don't think I have to
explain everything on how i did this so what I will do instead is upload a
timelapse of me editing this and you can have a look at it and try to figure
out yourself
I did use other 3rd
party plugin for this and they are
Sound keys they come
with red giant suite i guess try and figure out yourself on how you can get
these if you don't want to use this then default audio keyframes of ae is good
too for music with prominent and loud beats like the one featured in my edit
So what I did in this
edit is that i applied twixtor to layer and synced it to the sound key’s
automatically generated keyframes, keyframes value went from 0 to 100 whenever
it encountered a beat so I applied an expression to it -
linear(value,0,100,25,300) so what this expression does is it makes the twixtor
value go from 25% to 300% with every loud beat
[notice that I analyzed
the graph and found out that the values dont go from 0-100 but from 20-90
something so i wrote an approx value of 30-80 in expression however writing
0-100 wont matter much, sorry if you don't understand any of these) :(
Firstly, I added all the
stuff to the main comp layer and then I copied those layers and pasted them
inside the layer, else it would have made the video slower and all the time
that i spent selecting and arranging those videos inside premiere pro would
have wasted
Also i precomped each layer
[moving all attributes inside the comp] to preserve the timing of the videos
originally selected in premiere pro.
And then finally i
applied uni.VHS and cc vignette
And that’s basically it
And this is how my new edit looks
Thank you trb I love you
ReplyDeletesaxxxxxxx ... ek no
ReplyDeletethanq GOD
ReplyDeleteOk yaar
ReplyDeleteLoVe you mate xDDD
ReplyDelete